In this presentation, Gary Klein shares important information about air source heat pump water heaters (HPWH), with particular attention paid to where the warm air comes ...
Gravity Hot Water Heating Q&A
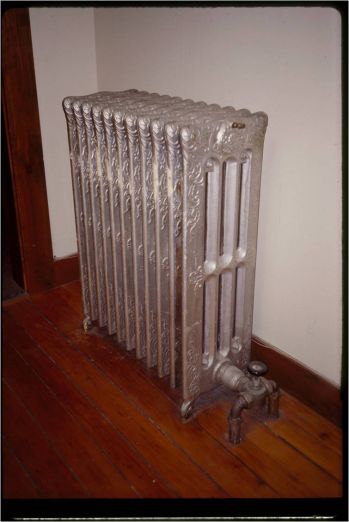
Q: How long has gravity hot water heating been around?
A: Gravity hot-water heating began quietly in the United States between 1875 and 1885. It was a Canadian import, a safe substitute for steam heat, which had been earning a notorious reputation throughout the world as being a pretty dangerous way to heat a building.
Q: What was wrong with steam?
A: The trouble with steam in the early days was that it ran under pressure and frequently exploded with disastrous results. Hot-water systems, on the other hand, were open to the atmosphere, and relatively safe because the old-timers usually limited them to a high temperature of 180 degrees F. In those days, you could liken the difference between a gravity how-water system and a steam system to that of an open simmering pot of water, and a pressure cooker gone berserk!
Q: So gravity hot-water became popular because it was safe?
A: Yes, and because these systems were also easy to maintain and, most of the time, operated with little or no trouble. They had a lot going for them, and they quickly became the preferred way to heat large American homes just before the turn of the century.
Q: Is it a simple system?
A: In theory, it is. The only moving part is the water itself, but to get that water to go where he wanted, a pipe fitter had to meld the knowledge and experience of Mr. Goodwrench and Mr. Wizard. If he did his job well, the system worked beautifully. If he didn't, it became a balancing nightmare.
Q: What did a typical gravity hot-water system look like?
A: Here's a diagram of an "upfeed" system.
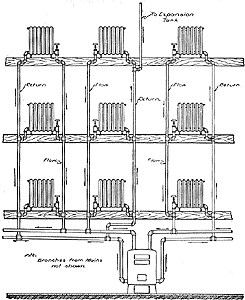
Q: Why did they call it upfeed?
A: Because the water fed up from the bottom (the boiler) to the top (the highest radiator).
Q: Where's the circulator?
A: There isn't one! Circulating pumps, which we use on modern hot-water systems, hadn't been invented yet so to move water from the boiler to the radiators, the old-timers depended on a basic law of physics: Hot water rises, cold water sinks.
Q: Why is that?
A: Because of the difference in density between hot and cold water. A cubic foot of water at 180 degrees F takes up about five percent more space than a cubic foot of water at 40 degrees F. It also weighs about two pounds less.
Q: Is that where the term "gravity" comes in?
A: Yes! When you heat water in a boiler, it will rise up into the pipes because it's lighter that the relatively cold water in the system piping. That colder water, in turn, falls back down into the boiler (by gravity), and before long, you have a Ferris wheel flow of warm water moving freely from the boiler to the radiators.
Q: What determines how fast the water moves?
A: Several things. First, there's the height of the system. The taller the building, the quicker the flow. Within reason, of course, because if the building is too tall, the water will cool and slow circulation to the upper floors. A three-story house is the practical limit for gravity hot-water heating.
And then there's the size of the pipes. The larger the pipes, the faster the water will flow. This is because large pipes offer less resistance to flow than small pipes. It's also the reason why the old-timers used two supply and two return tappings on their boilers.
Ultimately, the size of the pipes was also the reason steam replaced gravity hot-water heat in American homes. As the years went by, steam heat became safer, but the large-diameter pipes the gravity systems required continued to be expensive.
The third factor that determines how quickly the water circulates is the condition of the pipes. When the pipes are new, they're smooth on the inside. They offer very little resistance to the slow-moving water. However, as they age, the pipes develop little nooks and crannies because of oxygen corrosion. These tiny internal burrs increase frictional resistance, and that, in turn, slows the flow and the movement of heat to the radiators. Nowadays, we usually overcome this problem by adding a circulator to the system.
Finally, there's the difference in temperature between the supply and return water. The hotter the water, the faster it circulates. However, the old-timers always kept the maximum temperature at 180 degrees F to make sure the water never approached the boiling point.
Q: Did the old-timers work with a certain temperature difference between supply and return?
A: Yes, and to get the best efficiency, they limited the maximum temperature difference between supply and return to 20 degrees F. This was a function of pipe sizing (the smaller the pipes, the greater the temperature drop, and vice versa). So on the coldest day of the year, if water left the boiler at a maximum of 180 degrees F, it would return at a minimum of 160 degrees F. This assumes, of course, that the pipe fitter followed the accepted piping practices of the day.
Q: Did the hot water take up more space than the cold water?
A: It sure did! As I said before, when you heat water from 40- to 180-degrees F, you wind up with about five percent more water than you started with. You have to have a place to put that "extra" water.
Q: How did they deal with the "extra" water?
A: They used expansion tanks.
Q: What does an expansion tank look like?
A: A typical one looked like this.
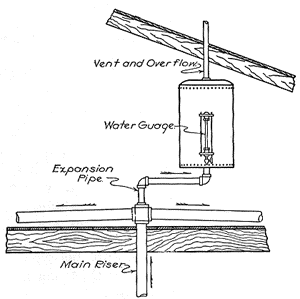
Q: Where did the expansion tank go?
A: Typically, at the high point of the system. You'll usually find them in the attic. The tank gives the expanding and contracting water a place to rise and fall.
Q: Suppose I put too much water into the system when I first fill it up. What will happen?
A: It will overflow from the tank through its vent and wind up on the roof.
Q: Can this do any harm?
A: Not to the system. It might leave some rust stains on the roof if the system is old, but that's about it.
Q: How much water should I put into the tank when I'm first filling the system?
A: Normally, you should maintain the tank at one-third full when the water is cold (there's often a gauge glass on the side of the tank so you can see what you're doing). As the water heats and expands, it will rise into the upper two-thirds of the tank and stop before spilling over onto the roof.
Q: How did they fill these tanks?
A: Some tanks had an automatic fill valve, which is very similar to the ballcock in a toilet tank. Others, the old-timers filled by hand with a valve that was either down in the basement or up in the attic.
Q: Wait a minute, if you're in the basement, how can you tell how much water is in the attic tank?
A: Good question! Chances are the boiler had an "altitude" gauge that showed the height of the water in the system. The gauge registered feet of altitude as well as static pressure.
Q: What's static pressure?
A: It's the pressure created inside the boiler by the water as it stacks up in the system piping. The gauge records static pressure in "pounds per square inch" (psi). One psi will lift water 2.31 feet (that's 28 inches) straight up, and that's where the "altitude" comes in.
Q: Do you have to take any special precautions with the upfeed gravity system?
A: Yes, if you have to drain the system, be careful how you refill it. Start off with all the radiator vents open. Then, slowly fill the system, one floor at a time. When water flows from the vents on the first floor, quickly close them all. Then, continue filling until water rises to the second floor. Shut all the air vents and move up to the third floor. Once you have all the radiators filled, fill the system to the one-third-full point in the expansion tank.
Q: Why is this method important?
A: Because there's so much air in those large pipes and radiators. If you try to fill the system all at once, and then go back and bleed each radiator, the escaping air from one radiator will cause the water to drop out of the expansion tank and the nearby radiators. This can pull more air into the system piping.
Q: What happens if I don't follow this fill procedure?
A: Usually, you'll wind up with "phantom" air problems. The air appears in this radiator today. You vent it. Tomorrow, it's in that radiator over there. You vent it. The next day, the problem appears somewhere else. It can be maddening.
Q: How does the air from the heated water get out of the system after the initial purge?
A: It vents out through that overflow pipe that sticks out through the roof. Usually, the tank sits atop the main system riser at a high point. The tank vents most of the air that the heated boiler water releases. Should some of this air wind up in the radiators instead of in the tank, it can slow the flow of heat to the rooms. Ideally, with this type of system, someone should bleed the radiators at the start of each heating season.
Q: Is there a danger of the attic tank freezing if the attic isn't properly insulated.
A: Yes, there is. And if that happens, the expanding system water will have nowhere to go. To avoid this potentially dangerous situation, many old-timers piped their tanks like this.
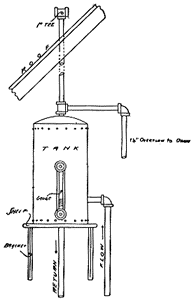
That second pipe, connected into the side of the tank, allows hot system water to circulate through the tank. Since the water is hot and in motion, it's much less likely to freeze.
Q: Why didn't they just go ahead and pipe all their tanks this way?
A: Because by circulating the water through the open tank in this way, the rate at which water will evaporate from the system increases. That means someone has to add more fresh water. Fresh water increases the rate of corrosion in the system and, over time, slows circulation.
Q: Suppose I decide to modernize the system by adding a circulator or replacing the boiler. Should I keep the open tank?
A: In a case such as this you'll probably want to close the system by replacing the open, attic expansion tank with a closed compression tank. This isn't always necessary, but it does cut down on the corrosion that takes place in the system.
Q: What's the difference between an expansion tank and a compression tank?
A: It's really just a question of semantics. An "expansion" tank is an open tank. A "compression" tank is a closed tank. Most people interchange the terms. As long as the person you're talking to knows what you mean, it really doesn't much matter what you call it.
Q: Were there other types of gravity systems?
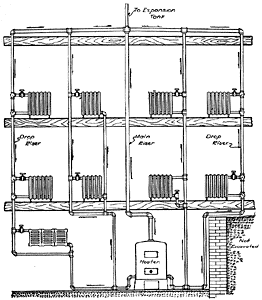
A: Yes. If the original owner of the home went first-class, he would have installed an overhead gravity system such as this one.
Q: How does the overhead system differ from the upfeed system?
A: In the overhead system, water goes first to the attic (or to a main suspended from the top floor ceiling) and then feeds down to the radiators. Because this "express riser" is very large, it offers less frictional resistance to the water. As a result, the hot water moves more quickly from the boiler to the radiators than it would in the upfeed system.
Another plus is the way the cooler water pulls the hot water through the radiators as it falls down the return risers. This force counteracts the effects of friction and makes the radiators heat faster. As a result, an overhead system generally costs less to operate.
Q: Is this type of system easier to vent?
A: Yes, much easier. In fact, because of the way the radiators are connected to the mains, you don't need radiator air vents with this system. All the system air vents automatically through the attic tank. It doesn't take long to fill this system either, and you don't have to worry about spilling water all over the floor while venting, as you do with the upfeed system.
Q: How did they pipe the radiators into the mains on this system?
A: They always used top and bottom connections. They could enter the top on one side of the radiator and leave through the bottom on the opposite side, or they could enter and leave through the same side. This second method saved a riser which made for a less-expensive installation.
Q: Didn't they need special fittings to make this work?
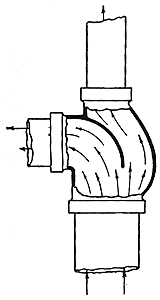
A: Yes. They had to divert water through the radiator. To do this, they used a special type of tee. Here's a picture of one.
Q: What did they call this tee?
A: They called it an "O-S" fitting after its inventor, Oliver Schlemmer of Cincinnati, Ohio. It was a beautifully simple device.
Q: Is this similar to a "Monoflo" tee?
A: It is, but the O-S preceded the Monoflo by many years. During the 1930s, the Bell & Gossett Company introduced their "Monoflo" tee (the name is a trademark). It went on to play a big part in American house heating during the years before World War II.
Q: Do these special tees "tell" the water where to go?
A: In a sense, they do. They create a path of least resistance for the water and direct it toward the radiator.
Q: Is there any other way of directing the water in this type of system?
A: There are a number of ways, and all of them are critical to the system's operation.
Q: Why is this?
A: Because the pipes in a gravity system are very large and contain a lot of cold water on start-up. Not all of that water is going to get hot at the same time. And since hot water is lighter than cold water, it has a tendency to shoot directly up to the top-floor radiators - just like a hot-air balloon. That's its path of least resistance.
Q: So the top floors tend to heat more quickly than the bottom floors in a gravity system?
A: Yes, and that leads to system imbalance.
Q: How did the old-timers get around this problem?
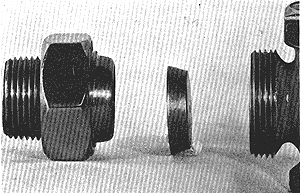
A: They sometimes added orifice plates to the top-floor radiator hand valves. Here's what one looks like.
Q: What exactly is an orifice plate?
A: It's a round piece of metal with a small hole drilled through its center. You could make one yourself out of sheet metal; most of the old-timers made their own.
Q: How did the orifice plate direct the water?
A: By increasing the resistance through the radiator it was assigned to. If water found it difficult to enter, say, a top-floor radiator because of the orifice plate, it would go to a radiator on a lower floor instead. In this sense, the orifice plate was similar to the "O-S" and "Monoflo" fitting. The big difference, however, was that instead of directing the water into the radiator it was assigned to, an orifice plate directed the water away from that radiator.
Q: What other methods did the old-timers use to make the water go where it was supposed to go?
A: More often than not, they'd pipe the job in such a way as to avoid the problem in the first place. Here, take another look at this upfeed system.
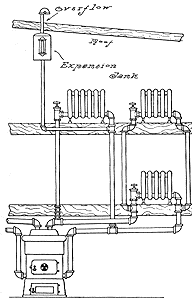
We have three radiators - two on the second floor, one on the first. The hot water's tendency is to race up to the second floor. But look closely at the way the fitter makes his lateral take-offs from the supply main. Notice how the hot water supply to radiator #1 comes off the side of the main. The fitter did it this way because on start-up, the hottest water will be at the top of the supply main.
That hottest water wants to go to radiator #1 but it can't get there right away because the water near the bottom of the horizontal main is colder than the water near the top of the horizontal main. That colder (and heavier) water is crowding the hotter water out of the way and driving it toward radiator #3, which just happens to be on the first floor.
Q: So you can tell from the basement where the risers are going?
A: Yes! They usually fed upper-floor radiators from the side of the main and first floor radiators from the top. That way, the system went into more of a natural balance.
Q: Did they do similar things with their vertical risers?
A: Yes, they did. Frequently, they'd supply a second-floor radiator from the top of the riser and a third-floor radiator from the side of that same riser.
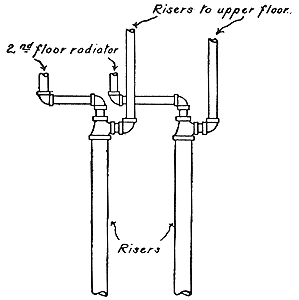
In this case, the second-floor radiator is the lower of the two. That's why it gets the water from the top of the riser.
Q: How about the horizontal mains? Did the old-timers use the same size all the way around the building?
A: Not usually. It was customary to reduce the size of the supply main as it worked its way around the building, but if the fitter reduced the pipe too quickly, flow would stop because there would be too much overall resistance.
Q: What rules did they follow?
A: Generally, they wanted the internal traverse area of the main to meet or exceed the internal traverse area of all the attached radiator hand valves. If the main was too small (or if someone added radiators to an existing main) some radiators wouldn't heat well. The competent fitters sat and calculated every job they worked on. They knew no two were quite the same.
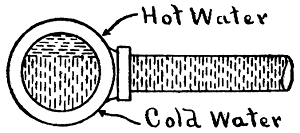
Q: What's internal traverse area?
A: Look down the round end of the pipe. The interior circle at the open end represents the internal traverse area. By using mathematics, you can figure out how many square inches of space there is inside that circle.
Q: Can you give me some examples?
A: Sure! Here's a list of common size pipe used in gravity systems with the traverse area in square inches.
1" = 0.86
1-1/4" = 1.5
1-1/2" = 2.04
2" = 3.36
2-1/2" = 4.78
3" = 7.39
3-1/2" = 9.89
4" = 12.73
5" = 19.99
6" = 28.89
8" = 51.15
Q: How about the supply and return mains. Do they have to be kept close together?
A: Yes, Ideally, the return main should parallel the supply main within a distance of no more than 8-1/2 inches. It should drop only when it reaches the boiler room.
Q: How did the old-timers bring their returns from their radiators back into their mains?
A: They followed this rule: Returns from first-floor radiators have to enter on the side of the return main because they leave from the top of the supply. This is important because the return from one radiator could block the return from another if the temperatures coming back from the two radiators are slightly different, which they almost always will be.
Q: Were there any special fittings for the mains?
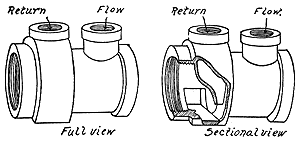
A: They used a number of them. Here are two examples of the more common ones. This is called a Eureka Fitting.
This one was known as the Phelps Single Main Tee.
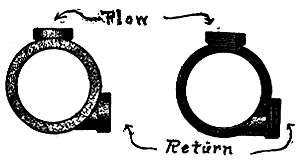
Notice how the hot water leaves from the top of the fitting while the cold water flows back into the side. Those old-timers were clever, weren't they?
Q: Is it difficult to troubleshoot gravity hot-water systems?
A: Troubleshooting can be tricky. There may be places in the system where hot and cold water pass each other in the same pipe. That might be perfectly normal, but you'll need to "see" it in your imagination to figure out what's going on.
Some problems may have existed for years before you got involved. Something as simple as an unreamed pipe can stop a radiator from heating, but then, so can the corrosion that builds up after sixty or seventy years of operation. You'll have to think clearly, and ask lots of questions.
Q: Does the water flow the same way here as it does in a forced circulation system?
A: Not at all! In fact, gravity hot-water heat is the mirror image of forced hot-water heat. When you use a circulator in any system, the path of least resistance will always be the shortest (lowest pressure drop) loop because that's the path with the least resistance to flow. Water is lazy, and when you pump it, it always wants to get back to the pump's suction as quickly as possible. Remember, in a gravity hot-water system, the path of least resistance is the top floor, which is usually the longest run. That's the opposite, the mirror image, of a pumped system.
Q: Can you give me a visual example of the difference?
A: Well, when I'm troubleshooting gravity hot-water heat I always think about the convective currents in a heated room. Here, think with me.
Air rises out of a radiator because it's hot and light (the same reason water rises out of a boiler). The air creeps across the ceiling and gives up its heat to the things it touches (as the water gives up its heat to the radiators). As it cools, the air in the room gets heavier and falls (the same way the water falls out of the radiators). Finally, when it reaches ground level, the now relatively cold air (like the relatively cold water inside the gravity system) scoots across the floor (or, in the case of the water, back toward the boiler) and enters the bottom of the radiator to replace the rising hot air.
But now, suppose you turned on a ceiling fan in that heated room. You'd change that convection current in a hurry, wouldn't you? You'd be "pumping" the air around the room instead of letting it rise and fall by its own buoyancy. It would go where the resistance was least when the fan was on, wouldn't it? Sure it would - just as hot water moves where the pump tells it to go.
That's the difference between gravity hot-water heat and forced hot-water heat. One moves by natural convection, the other at the will of the pump.
Q: Can those orifices plates we looked at before cause system problems?
A: Sometimes. When you add a circulator to a gravity system, the path of least resistance naturally shifts to the first-floor radiators because that's the shortest path back to the boiler. The water doesn't want to go to the top floor any more. Those orifice plates are in the top-floor radiators. The old-timer put them there to force water down to the lower floors.
Q: What's wrong with that?
A: Well, now that you're pumping the system, the orifices are going to make sure the resistance through the top-floor radiators is always greater than it is through the lower floor radiators. In fact, once you add the circulator, you'll probably have no flow at all through the top-floor radiators!
Q: Won't you be able to tell right away that the orifices are causing the problem?
A: Probably not because this problem looks exactly like an air problem. Think about it. The trouble is on the top floor. You may have drained the system when you installed the circulator. And now the folks have no heat. It looks like an air problem, but it's really a flow problem.
Q: How will I know it's a flow problem?
A: When you bleed the radiator you won't get any air. And if you don't get any air, it ain't an air problem!
Q: So what's the solution?
A: Take the orifice plates out of the top-floor radiators and stick them into the first-floor radiators. In other words, reverse the mirror image. The system will go into balance and that phantom "air" problem will be just a bad memory.
Q: Is there anything else I need to watch out for?
A: Yes, painters! If you have a sudden no-heat call on the lower floor of a gravity hot-water system, check to see if someone recently removed the radiators to strip the paint from it (or removed the radiator to paint the wall behind it). Painters and paint-stripers often close the hand valves and disconnect the radiators to make their job easier. When they do, the orifices usually fall out of the hand-valve unions. Since the average painter doesn't know beans about heating (gravity or otherwise) he doesn't know what to do with the orifice plate. To him, it looks like a piece of junk. He'll throw it in the garbage, and figure he's doing the owner a favor by "getting rid of that lose hunk of metal that was clogging up the pipes and blocking the heat." Without the orifice plate, however, most of the water will flow to the top floor.
Q: When is it a good time to convert a gravity hot water system to forced circulation?
A: Usually, when the gravity system slows down because of the corrosion which has taken place over the years. Those little nooks and crannies in the pipe slow the flow and stop the heat. The natural response is to raise the temperature to make the water circulate more quickly. But you can only push the temperature so far before you begin to ask for trouble. That's when it's time to convert the system to forced circulation.
Q: What does this involve?
A: You have to add a circulator and (usually) close the system to atmosphere. You'll also have to make some changes to the near-boiler piping.
Q: What changes?
A: The old boiler probably has two outlets and two inlets because the idea in those days was to get the greatest possible gravity-induced flow of water through the boiler. The more holes, the better the circulation. That piping looked like this.
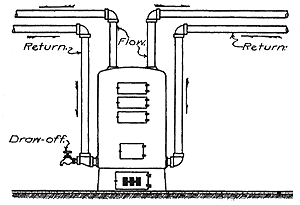
When you add the new circulator, you won't need to use such big pipes coming and going out of the boiler. In fact, you'll want to reduce the size of your near-boiler piping to give the circulator something to "push" against.
Q: Why does the circulator need something to "push" against?
A: So it won't kick itself off on its internal overload protector. A circulator does its maximum work when there's little or no resistance to flow. In a gravity system, the large pipes can't offer much resistance.
Q: Will I still need those double inlets and outlets at the boiler?
A: No, and that's another reason you should rework the near-boiler piping. With two inlets and two outlets the pumped flow might short-circuit around the boiler without moving out into the system.
Q: Suppose I don't want to repipe the boiler?
A: You may have to use two circulators - one on each supply line.
Q: How will I know what size pipe to use on the new boiler?
A: A good rule of thumb is to take the largest pipe, divide it in half and then drop one size from that. That becomes the size of your new near-boiler piping. For instance, let's say the largest pipe is 2-1/2" (if there are two inlets and outlets, you only have to consider one of them). Divide that in half and to get 1-1/4". Now drop down one size to 1" and that's what you'll use all around your new boiler.
If your largest size happens to be two-inch, pipe your new boiler in 3/4". It will look odd, and it might make you feel uncomfortable, but it'll work. Different systems call for different piping techniques. One size doesn't fit all and a gravity conversion is definitely different from a brand-new, forced-circulation job.
Q: How do I size the circulator for a conversion job?
A: It's real easy with these jobs. You're looking for high flow at a relatively low head pressure. A good choice is a circulator similar to Bell & Gossett's Series 100.
Your goal is to move a lot of water around the system as quickly as possible against very little resistance to flow. This type of circulator does just that.
Q: Can't I use a small, water-lubricated circulator instead?
A: These are fine circulators for most modern, forced-circulation systems, but not the best choice here. You don't need to generate much head pressure on these conversion jobs because the pipes are enormous and the resistance to flow is almost nonexistent. Using a small, high-speed, wet-rotor circulator is a poor choice on a gravity conversion because it will do the exact opposite of what you're trying to accomplish.
Q: I'm not sure I understand the difference between flow and head pressure. Can you explain it?
A: Sure! Flow is the "train" on which heat travels. Flow "delivers the goods" to the radiators. Head is resistance to flow and it's important, too, but only in relation to flow.
Q: Well, then what determines the head pressure?
A: In general, the size of the pipes. The smaller the pipes, the greater the required pump head, and vice versa. Since gravity systems have very large pipes, there's no need for a high-head circulator. What you need is high flow.
Q: Where is the best place to install the circulator?
A: It's always best to put it on the supply side of the boiler, pumping away from the compression tank. Piped this way, the circulator will add its pressure to the system's fill pressure and make it easier to get the air out. The system will also run more quietly.
Q: Do I have to use a bypass around the boiler on these jobs?
A: Most boiler manufacturers recommend that you install a bypass around their new boilers when you use them on a gravity system. Here's what that bypass piping looks like.
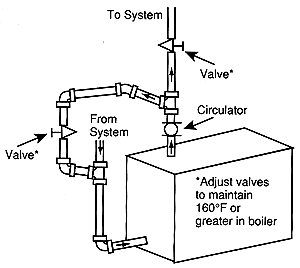
Q: What's the reason for the bypass?
A: It's there to protect the boiler against condensation and thermal shock.
Q: What's thermal shock?
A: Thermal shock is what happens to hot metal when you hit it with relatively cold return water. If you take a glass plate out of the oven and run cold water over it, it will break, won't it? That's thermal shock.
Q: How does the bypass piping help prevent this?
A: The bypass allows hot boiler water to enter the returning colder water and raise its temperature. The combined flow then enters the boiler at a temperature greater than 140-degrees F., which is the minimum allowed for many boilers.
Q: You said something about condensation. What's that all about?
A: If the return water temperature is too cool, the combustion gasses can reach their dew point and turn into a liquid inside the boiler. That liquid is very corrosive to metal. It can damage or destroy a boiler in no time at all. By using the bypass, you're mixing hot supply water into the relatively cold return water and raising the boiler water temperature to a point where the gasses can't condense inside the boiler.
Q: Does the bypass serve any other purpose?
A: In some cases, an installer will pipe the bypass to the suction side of the circulator and use balance valves to divert a good part of the system flow around the boiler. This lets the boiler to come up to high-limit temperature and shut off. Without the bypass, the large volume of water moving through the boiler often keeps the temperature low and keeps the boiler from reaching high-limit, which can increase the fuel bill.
Q: Is there another way to pipe the replacement boiler without using the bypass?
A: You can use primary/secondary pumping techniques.
Q: What's primary/secondary pumping?
A: It's a way of treating the flow through the system and the flow through the boiler as two separate things.
Q: Is there an advantage to this?
A: There is because some boilers require a minimum flow to operate at their maximum potential. This flow may not be the same as the flow you need in the system. If you use a bypass line, someone may adjust it after you've left. This can cause problems with both the boiler and the system.
Q: How do I pipe for primary/secondary flow?
A: Tie the existing supply and return lines together to form a system loop. Then, use two standard tees, set no further than a foot apart, and attach the new boiler to the loop. Like this.
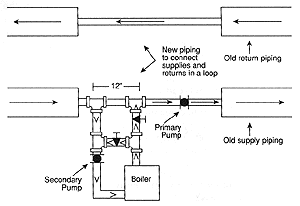
The primary pump serves the system, while the secondary pump takes care of the boiler. You meet the flow needs of both in a very simple way. The not-more-than-twelve-inch spacing between the tees allows the pumps to operate independently. When the secondary pump is off, there will be no flow through the boiler if you keep the spacing within that 12" limit.
Q: Why is that important?
A: By controlling the flow through the boiler, you're taking charge of the stand-by losses of the system. If the burner is off and the boiler pump is stopped, you will have minimal loss to the flue.
Q: How do I control a primary/secondary system such as this?
A: You can have both pumps and the burner come on at the same time. Or better yet, you can run the system pump (the primary) on an outdoor-air reset control, and cycle the boiler pump (the secondary) and the burner to meet the temperature needs of the building on any given day. This is the ideal way to manage an old gravity hot-water system.
Q: Can I use more than one boiler with this type of system?
A: You sure can! This system is ideally suited to a multiple-boiler set-up. Watch.
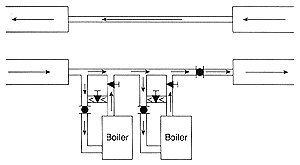
Here, we're using two boilers instead of one. The primary pump moves the water through the radiators. The secondary (boiler) pumps come on to bring a portion of the primary flow through the boilers. On mild days, you'll use just one boiler, on colder days, the boilers will piggy-back to bring the water temperature up to the right level.
Q: What's the advantage of using two boilers?
A: Each boiler is sized to half of the maximum load. For instance, let's say the total required load on the coldest day of the year is 250,000 Btu/hr. If we use two 125,000 Btu/hr boilers instead of one 250,000 Btu/hr boiler, we'll be burning about half as much fuel during a large part of the heating season.
Q: You said we'll be getting rid of the open expansion tank in the attic when we convert the system to forced circulation. Why do we have to do that?
A: Cast-iron and steel boilers last a lot longer when the system is closed. That's because there's a lot less oxygen corrosion in a closed system.
Q: Do I always have to get rid of the open tank?
A: Not necessarily. A good choice for a gravity conversion job is a copper finned tube boiler. These boilers are non-ferrous and deal with oxygen especially well. They're also impervious to thermal shock (they have flexible heat exchangers) and work well with cooler water (typically down to 105 degrees F).
Q: Let's say I decide to close the system. What do I need to know to size a closed compression tank for a conversion job?
A: You'll have to know three things:
- The gallons of water in the system
- The difference between the fill and relief pressures, and
- The average water temperature of the system which in this case, should not be more than 170 degrees F
Q: Why is the average water temperature limited to 170 degrees F?
A: So the water won't flash to steam in the open attic tank. The old-timers sized their radiation to provide plenty of heat on the coldest day of the year with a maximum high limit of 180 degrees F at the boiler. The water would leave the boiler at 180 and return at about 160, giving them an average temperature of 170 F within the radiation.
Q: If I run the system with hotter water what will happen?
A: You'll probably overheat the people and raise their fuel bills.
Q: What are the guidelines for sizing a plain steel compression tank for a gravity conversion job?
A: Measure the total system radiation and then apply this rule of thumb:
- When there is less than 1,000 square feet of radiation on the job, multiply the total by .03 to determine the tank size in gallons.
- If the total radiation is between 1,000 and 2,000 square feet, use .025 as a multiplier.
- If the total radiation load is greater than 2,000 square feet, use .02 as a multiplier.
- This will give you the size of the standard steel compression tank in gallons.
Q: How will I know how many square feet of radiation each radiator contains?
A: You can use this chart as a guide:
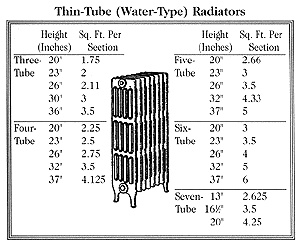
Q: What is a Square Foot of Equivalent Direct Radiation equal to in Btu/hr?
A: For gravity conversions, we can say that each square foot of EDR will be equal to 150 Btu/hr when the average water temperature is 170 degrees F
Q: Will these tanks be larger than they would be on a more-modern system?
A: Yes, these tanks will be a lot bigger than the ones you'd use on a job sized for forced-circulation. That's because jobs sized with circulators in mind use smaller pipe. Smaller pipe means less water in the system. Less water means less expansion, and less expansion means a smaller compression tank.
Q: Suppose I want to use a diaphragm-type compression tanks, how should I size it for a gravity conversions job?
A: You can use this rule of thumb:
Take the size of the standard steel compression tank in gallons and multiply by .55 if the building is two-stories tall or .44 if the building is three-stories tall. The answer will give you the volume of the diaphragm tank.
Q: Can you give me an example of this?
A: Sure! Let's say we have a two-story house with 1,000 square feet of radiation. We'll size a standard steel tank first: 1,000 X .03 = 30 gallons. Now, since it's a two-story house, we have to multiply that by .55 to get the volume of the diaphragm tank. (30 X .55 = 16.5 gallons of required volume in the diaphragm tank)
Q: Where do I find the "volume" of the diaphragm tank?
A: In the manufacturer's specification sheets. Here, for instance, are the volume ratings of standard diaphragm-type tanks made by Amtrol, Inc. The first number is their tank model number and the next is its volume:
15 = 2
30 = 4.4
60 = 7.6
90 = 14
SX-30V = 14
SX-40V = 20
SX-60V = 32
SX-90V = 44
SX-110V = 62
SX-160V = 86
And here are the volumes of the tanks made by Vent-Rite (Flexcon Industries):
VR 15 F = 2.1
VR 30 F = 4.5
VR 60 F = 6.1
VR 90 F = 21
SX VR30 F = 21
SX VR40 F = 21.0
SX VR60 F = 29.0
SX VR90 F = 37.0
SX VR110 F = 53.0
SX VR160 F = 74.0
For the building in our example, you'd use either an Amtrol SX-40-V, a Vent-Rite VR 90 F, or any combination of smaller tanks which equal or exceed 16.5 gallons of volume. If you wanted, you could use four Amtrol 30s or four Vent-Rite VR 30 Fs, for example.
Q: Do I need to check anything on these tanks before I install them?
A: Yes, always check the air pressure on the diaphragm side of the tank. It should equal the system fill pressure when you have the tank disconnected from the system. The fill pressure for a two-story building is typically 12 psig; for a three-story building, it's 18 psig. If the pressure is too low, use a bicycle pump or an air compressor to increase it. The tank's pressure (when disconnected from the system) should always equal the system fill pressure (the pressure reducing valve's setting).
Q: What method should I use to size the replacement boiler?
A: You should size the replacement boiler based two things: an accurate heat loss calculation of the building, and an accurate measurement of the existing radiation. Don't settle for one or the other, check them both and compare.
Q: Why is this so important?
A: By checking both the heat loss and the radiation, you'll be able to calculate the proper design temperature for your converted system. Many old-timers oversized their radiators because the only radiation charts available at the time listed steam ratings. One square foot EDR in steam work will put out 240 Btu/hr. One square foot EDR in hot water work (based on an average water temperature of 170 degrees F) will put out 150 Btu/hr. This is because water at 170 degrees F is cooler than steam at 215 degrees F.
To compensate for the charts, the old-timers added 60 percent to their radiation sizing. This, as you can imagine, led to some hefty over-sizing.
Q: Is that a bad thing?
A: It can actually work out to be a good thing. If the radiators are oversized, you'll be able to run the system at a relatively low average water temperature. I've found that most conversion jobs run well at an average water temperature of 150 degrees F (in the New York City area), and that's on a day when the outside temperature reads zero! Lower boiler water temperatures mean lower fuel bills.
Q: Is there ever a time when I should oversize the new boiler on these jobs?
A: No! There is absolutely no reason to oversize a boiler. Base the size on the heat loss of the building as it exists today. Pipe it properly, using the bypass line we discussed before. Then, if the job is over-radiated, lower the high limit water temperature accordingly to save fuel.
Q: What sort of hydronic accessories do I need on these jobs?
A: Use a good air separator to limit the possibility of air noises and lack-of-heat problems. Locate it in your new near-boiler piping on the supply side of the system (where the water is hottest), just before the circulator. You should locate the compression tank at a point near the air separator.
Fill the system with a pressure-reducing at the point where you've connected the compression tank into the system. That's the "point of no pressure change," the only place in the system where the circulator's pressure can't affect the system's pressure.
You'll also need a flow-control valve to prevent gravity circulation when the circulator is off. Pipe it in right after the circulator.
Q: If I wanted, could I switch the system back to gravity?
A: Yes, that's one of the nice things about these conversion jobs. They're real easy to switch back (temporarily, at least) should something happen to the circulator. All you have to do is crank open the little lever at the top of the flow-control valve and the hot water will once again rise out of the boiler and up into the radiators.
Q: What are my control options with these conversion jobs?
A: Well, there's primary/secondary pumping. We looked at that before. You can also install thermostatic radiator valves on the radiators.
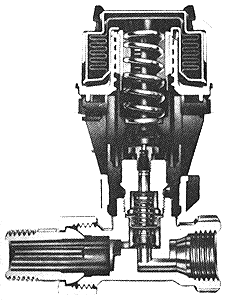
These devices sense the air temperature in each room and modulate the flow of water through the radiator. They're completely self-contained and need no electrical wiring. They last for years, are relatively inexpensive and have been around since the 1920s. I've found they keep the room temperature within one or two degrees F of the set point. With thermostatic radiator valves, every room becomes its own zone.
Should you chose to use them, set the circulator to run continuously during the cold months. The valves will take care of the comfort level in each room. If you want to take control a step further, vary the boiler temperature based on that outdoor-air reset controller I mentioned before. This control also helps do away with any expansion/contraction noises you may have in the system.
Q: Is there a simpler way to control a conversion job?
A: The simplest way is to have the house thermostat turn on the burner and the circulator at the same time. This doesn't give you the ability to zone each room, but it is less expensive, and it works. Don't forget that bypass line around your new boiler
Q: Suppose I decide to keep the old boiler and just add a circulator and a flow-control valve. Will this save me fuel?
A: Don't be surprised if it increases the fuel bills! Old boilers and gravity systems work well together because when the burner shuts off the residual heat in the boiler rises up into the radiators. However, when you install a flow-control valve, the residual heat goes up the flue instead of into the radiators. The result? Higher fuel bills.
Q: How about if I just install a circulator on that old boiler and forget about the flow-control valve?
A: This will help lower the fuel bills by moving the hot water to the radiators more quickly, while not stopping the residual heat from moving into the radiators. You'll have to fiddle with the thermostat's heat anticipator, though, to keep the system from overriding. Also, you may need more than one circulator if there's more than one set of supply and return lines.
Q: Can I add a zone to an existing gravity system by tapping into the supply and return lines with a circulator and a loop of baseboard?
A: I wouldn't do this. The forced flow through your new zone is bound to affect the operation of your gravity system. How it affects it will vary from system to system (no two are alike), but from what I've seen, it usually leads to problems. I'd avoid it if I were you.
If the people are interested in zoning, talk to them about adding a circulator to the main part of the house as well, and mention those thermostatic radiator valves I told you about before.
Q: Were there specialized systems of gravity hot water heating?
A: Yes, Honeywell made a system called "accelerated hot water heating" which was very popular in its day.
Q: When did they use this system?
A: In the early days of this century.
Q: Are these systems still around?
A: There are enough of them out there to make you scratch your head in wonder.
Q: What was Honeywell trying to achieve with this system?
A: They wanted to find a faster way to move the water from the boiler to the radiator. They knew that if they could do this, they would save the consumer money on fuel.
Q: Why didn't they just use a circulator?
A: Because circulators hadn't been invented yet!
Q: So how can you make the water move more quickly without using a circulator?
A: By raising its temperature. The hotter the water, the faster it flowed.
Q: But if they raised the water temperature, wouldn't there be a problem with water boiling in the open expansion tank?
A: Yes, under normal circumstances, but with the Honeywell system, the old-timers were able to run the system under pressure.
Q: How much pressure?
A: As much as 10 psig at the top floor, and since the boiling point of water increases with a rise in pressure, they could have temperatures as hot as 240 degrees F in the radiators. That made the water circulate very quickly.
Q: Was there a danger in pressuring this type of system?
A: Normally, there would be because the expansion tank was the weak link. It was usually made of copper or galvanized steel and held together with rivets. It wasn't built to withstand to take the strain. Apply too much pressure and the tank could (and frequently did!) explode, taking the top of the house with it.
However, with the Honeywell system, a special device called a Heat Generator kept the tank separated from the boiler, the system piping and the radiation.
Q: What did this device look like?
A: It was made of cast-iron and stood about 2-1/2 feet high.
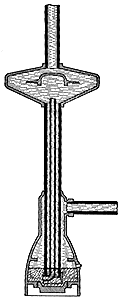
There was a narrow steel tube inside the unit's main tube that dipped down into a pot filled with mercury.
Q: Why did they use mercury?
A: Because it's heavy. They used the mercury to separate the water in the boiler, piping and radiation from the water in the open expansion tank. Here, take a look at how the Heat Generator tied into the system.
The top pipe went up to the open tank. The side pipe connected the system to the Heat Generator. The mercury kept the two sides separated.
Q: How did the Heat Generator work?
A: As the old-timer built pressure on the system, the water in the boiler, piping and radiation expanded and pressed down on the mercury.
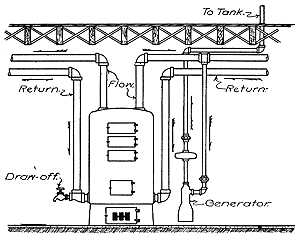
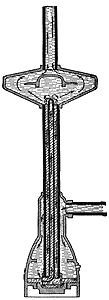
The mercury rose up the narrow tube and cascaded back down into the pot through the wider, outer tube. As long as the water was expanding, the mercury continued to circulate.
Q: Why didn't the mercury rise up into the open expansion tank?
A: Because of its weight. Mercury's pretty heavy. In fact, it's nearly fourteen times heavier than water.
Q: Can the water in the boiler, piping and radiation enter the bottom of the mercury tube?
A: Yes, if the system pressure rises high enough. The water will then enter the tube and separate from the mercury in that wide separation chamber at the top of the Heat Generator. From there, it rises into the expansion tank.
Q: So the Heat Generator wouldn't let the system pressure rise above a certain pressure?
A: Right! It limited the system pressure to 10 psig at the top, without putting any pressure at all on the open expansion tank. This made the operation thoroughly safe, and it also made the water circulate very rapidly.
Q: I can see how Honeywell's device increased the speed at which the system heated, but what advantage, if any, did it offer the installer?
A: Because of the higher temperatures, the installer could downsize all his radiation by as much as 15 percent.
Q: Did the old-timers use other types of devices such as this one?
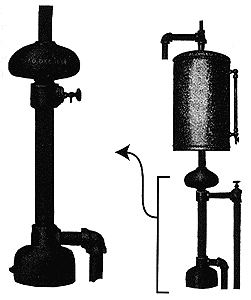
A: Yes, there was a similar one called the Klymax Heat Economizer (sounds sexy, doesn't it?). Here's a picture of one attached to the bottom of an open expansion tank.
Q: Were there any others?
A: There were a bunch of others. Here's another example. They called this one the Phelps Heat Retainer.
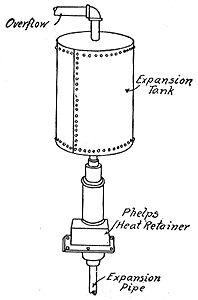
This device operated by opening and closing a double-acting valve which was encased inside a cast-iron box. The side of the valve which opened to the atmospheric tank had a 16-1/2 pound weight. This weight would lift and open the valve when the system reached 250 degrees F. The expanded water then moved safely into the open tank.
When the pressure dropped below 16-1/2 pounds the weight closed the valve and the shrinking water opened a retainer valve which allowed the water in the tank to reenter the system piping.
Q: Did Honeywell use a special valve at the radiators?
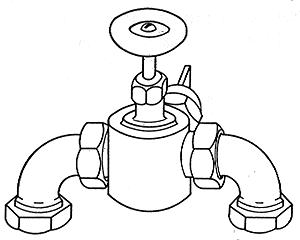
A: Yes, they had something called the "Unique" valve, and from the looks of it, I'm sure you can see why they called it unique!
Q: How did this valve work?
A: To understand, you have to look inside. Here's a picture of the valve when it was closed.
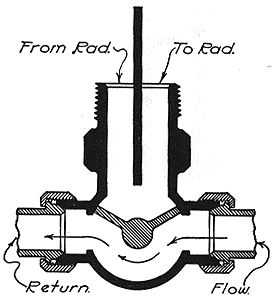
As you can see, water flowed past the radiator when the valve was in this position, but look what happens when you open the valve.
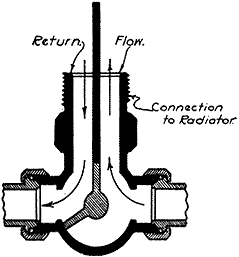
The water now enters the radiator on one side of the internal baffle, as the cooler, return water moves in counter-flow past the other side of the baffle.
Q: Was this the same Honeywell Company we know today?
A: One and the same!
Leave a comment
Related Posts

In this all-technical three-hour seminar, Dan Holohan will give you a Liberal Arts education in those Classic Hydronics systems. He’ll have you seeing inside the pipes as...
We always have turkey for Thanksgiving. I mean who doesn’t? My job wasn’t to cook it, though; it was to eat it.